Category Archive: Photos

Building Our Garden Path – And Almost Finishing!

It just seems like yesterday we were building the raised bed for our vegetables and planting new flowers in the yard, but today we officially started preparing for the winter. Crazy right? I really understand the saying “Time flies!” But before I get into preparing the yard for winter I should talk about the garden path.

In April 2008 we came up with a plan for a path in our backyard. The path was to be the central point for all landscaping, and it leads to our back seating area under the oak tress. We decided to start off small just to make sure we liked the look of it.

Beginning of the Backyard Path

Beginning of the Backyard Path

Everything looked promising, and when Steffi’s parents visited (still April 2008) they bought her some more pavers for her birthday. We put a few more down and then all of a sudden it was March 2009 (almost a year later). How on earth did that happen?!

With the impeding visit of Steffi’s parents coming up in April we felt obligated to get those pavers laid, so we once again got busy! This time my mom came to supervise the project to make sure it was done correctly. Just check out her face in this picture. She really has that “motherly” attitude down. Okay, okay… she actually was helping. She wasn’t just supervising, but the photo is priceless. You can also see the path in the background.

Mom Supervising

Mom Supervising

When we finished this VigRX Plus time the path made it about to the halfway point. A little progress here and there and we were eventually bound to get there.

When Steffi’s parents came to visit they saw what a fantastic job we were doing with the path, so they gave us BOTH pavers for our birthdays! This time it was enough to finish the path! What a wonderful birthday present! (I know what you are thinking, but I’m not being sarcastic here.)

Fast forward to October… the pavers were still sitting in the backyard until yesterday. We finally finished laying them and we had just the right amount to make it to the seating area. Hooray for kind of finishing projects. We still have to remove all of the bricks and put some sand down, so until then we have a not-so-level path. It should at least hold us over until next spring.

Path towards the back fence

Path towards the back fence

Looking back towards the house.

Path towards the house

Path towards the house

And just as a reminder this is what we started with.

No Path

What we started with!

Today we started preparing the garden for winter. We did some general weeding and trimming, and we started laying down fresh mulch to protect all of the plants from the freezing temperatures. Last years we had some success with a few annuals that decided to return, but somehow we lost some perennials. Go figure. This year we are trying to be a little more proactive.

Posted in Before and After, Cooking, Our Bungalow, Photos, Westview Bungalow | Tagged , | Comments Off on Building Our Garden Path – And Almost Finishing!

Blooming Kudzu and Flooding Rain

Did you know kudzu was in bloom? No you didn’t? Well, I probably wouldn’t either, but our neighbor must be such a fan of the kudzu flowers that he’s dedicated his whole back yard to growing it. You see the red spot in the photo below? That’s a convertible car. I think he uses it as an accent statue piece to grow his kudzu around.

Overgrown kudzu backyard

Overgrown kudzu backyard – can you spot the car?

And this is a pretty kudzu flower I picked from the kudzu attempting to engulf our fence. Didn’t know what kudzu flowers looked like? Well, now you do. They’re pretty purple flowers that smell sweet like honey.

Kudzu flower

Kudzu flower

So where did kudzu come from, and why is it so well spread? A quick history from maxshores.com seems to answer these questions:

Kudzu was introduced to the United States in 1876 at the Centennial Exposition in Philadelphia, Pennsylvania. Countries were invited to build exhibits to celebrate the 100th birthday of the U.S. The Japanese government constructed a beautiful garden filled with plants from their country. The large leaves and sweet-smelling blooms of kudzu captured the imagination of American gardeners who used the plant for ornamental purposes.

Florida nursery operators, Charles and Lillie Pleas, discovered that animals would eat the plant and promoted its use for forage in the 1920s. Their Glen Arden Nursery in Chipley sold kudzu plants through the mail. A historical marker there proudly proclaims “Kudzu Developed Here.”

During the Great Depression of the 1930s, the Soil Conservation Service promoted kudzu for erosion control. Hundreds of young men were given work planting kudzu through the Civilian Conservation Corps. Farmers were paid as much as eight dollars an acre as incentive to plant fields of the vines in the 1940s.

And with the torrential downpour we’ve had for the last 6 days the crawl space has flooded again. No wonder, considering Atlanta received 15 inches of rain in the last 24 hours! It makes the last flooding of 6 inches nearly seem harmless. Patrick walked through the water to move some items and we measured 22 inches of water!!! Needless to say our furnace and hot water heater are not working. We just have to keep our fingers crossed that once everything dries off both of them will turn back on.

Flooded crawl space

Flooded crawl space

Flooded crawl space

Flooded crawl space

In the meanwhile our wonderful neighbors are once again coming to the rescue by lending us their water pump – which we are actually using this time around. It’s pumping as I write…

Posted in Gardening, Our Bungalow, Photos, Westview Bungalow | Tagged , | Comments Off on Blooming Kudzu and Flooding Rain

Front Step Nightmare

In the house painting entry I mentioned the unsatisfactory experience we had with getting our front steps redone, so I wanted to elaborate about our experience.

As I previously mentioned, since we were on a roll with getting the house painted we thought we might just as well tackle the stairs. I think it was actually a safety hazard. The steps were uneven and pieces were falling off. When you stepped on a certain spot the wrong way your foot could slip off with a piece of concrete. Needless to say it was in dire need of getting redone!

Old Exterior entry stairs

Old exterior entry stairs

When one of the painters mentioned that he had an acquaintance that did masonry work we got an estimate and told them to go ahead. They said they’d come at 11:00am the next day, which was fine with us as we’re not early birds.

11:00am came and went and the mason didn’t show up. Finally at noon we called our painter, asking about the mason. He said he was on the way. More time passed and still no sign of the mason. We called our painter and asked for the mason’s number so he wouldn’t have to be the middle man. When I called the mason he said he was on the way and asked where the nearest big box store was so they could pick up the materials.

Finally around 2:30pm the mason showed up – without materials. In hindsight we should have told him “adios” at that point, but of course it is our human nature to give the person the benefit of the doubt. So off him and his two guys went to pick up supplies. They came back around 3:30pm and started taking measurements and cutting up wooden boards to create a form. Additionally they tore out any loose cement.

The forms were placed on top of our historic salvaged brick path and we were like “uhmmmm, those are not supposed to be cemented into the stairs!” So they moved them. One thing that annoyed me about them is that they were so hectic. They were trying to do things so speedy (aside from arriving on time, of course) that it felt rushed. I think the whole time they were here my adrenaline was pumping because I was anxious that they would do everything well because it just felt so rushed.

I want to say they finally started pouring the first (bottom) step sometime after 4:00pm. You know, around the time when all other contractors usually clock out for the day. Then the second step was poured, then the third. I think on the third one they were starting to run low on materials and tried to scrape any last cement out of the bucket. Then we were told we had to wait about an hour for it to dry. At that point they would take the boards off and the cement would be hard enough to stay in place, but soft enough to round off the edges, smooth out the surface, etc.

Pouring the concrete steps

Pouring the concrete steps

Next is the step were I really think they got ahead of themselves. This goes back to what I was saying previously that they just felt so hectic the whole time they were here. They were too eager to get the job done and over with. I don’t know if they thought it would be a quick job to get money quickly or what. It was starting to be late in the work day and they probably wanted to get home soon. In any case, they took the boards off. The bottom step was fine. The second step was fine too. The third top step turned into a nightmare. It obviously had the least amount of time to dry, and it was the one were they ran out of cement powder so I think it may have been wetter than the other two steps as well. Next thing we knew the damn step was starting to collapse!

Cracking Wet Concrete

Cracking Wet Concrete

They kept trying to push it back in, but no matter what they did it kept sagging back down. After various attempts they determined they needed to buy another bag of concrete. Patrick and I had been frustrated with them from the beginning since they already showed up three and a half hours late. Needless to say we were quite frustrated by this point with all the things going wrong. After taking another hour to get the extra bag of supplies they attempted to fix the step, but the cement had already dried a certain degree so that we feared it would not blend in properly. After that they put a small board against it and told us to leave it on for another few hours.

By the time they left it was around 9:00pm. It was too dark to properly see how bad the damage would be. The next morning left us kind of unsatisfied. We were mad at the guys for arriving late, not being ready with materials, rushing through everything, not leaving sufficient time to showcase proper craftsmanship, and mad at ourselves for giving them the benefit of the doubt rather than recognizing the initial signs that this was not going to work out the way we wanted it.

The next morning

The next morning

In the end the stairs are still 10 times better than the ones they replaced. We’re just perfectionists, and when you spend the money to hire a professional you expect to receive a good product in the end. In the meanwhile we’ve hidden the questionable top stair by placing our flower pots in front of them.

Finished steps

Finished steps

Now we’ve been debating painting the stairs. Anyone have any input?? For one we’re not sure if the “natural” look is the way to go? Secondly painting the stairs would help cover up the mishap. The only concern is that if you paint stairs once you’ll always have to repaint them from the wear and tear they’ll be getting. So if anyone has any input, suggestions, advice, whatever…please let us know!

Posted in Before and After, Our Bungalow, Photos, Westview Bungalow | Comments Off on Front Step Nightmare

Westview Bungalow Happenings

So what have we been up to these last few summer months? For one we were excited about how tall the tomato’s got! We just had to keep building more stories onto our “skyscraper” to keep up with the tomatos. Unfortunately since this photo they’ve caught disease and don’t look as pretty and green anymore.

Our tomatoes are out of control!

Our tomatoes are out of control!

We harvested a whole bunch of tomatoes, which have been used for pasta dishes, sandwiches, salads, etc.

Homegrown tomatoes

Homegrown tomatoes

Except I don’t know how many more we’ll get because we have some thieves among us! We pretty much haven’t seen a red tomato since those damn squirrel’s figured out that they like to eat them!

Squirrel stealing tomato

Squirrel stealing tomato

We also helped organize the Second Annual Ontario Park Cook-Out. This year we figured out to go after local politician’s for donations! We put the event on to enable neighbors, police, and fire fighter’s to get to know one another better.

Ontario Park BBQ

Ontario Park BBQ

And lastly we added a new member to our family! Welcome little Buster! We got him a week and a half ago when he was 8 weeks old. One of the neighbors had been feeding a friendly stray cat (perhaps someone moved out and left it behind?) which had two babies. So what do we do? We go over to have a few glasses of wine with the neighbors and we end up coming home with a kitty!

Baby Buster Kitten

Baby Buster Kitten

Posted in Gardening, Our Bungalow, Our Neighborhood, Photos, Westview Bungalow | Comments Off on Westview Bungalow Happenings

We Are No Longer The Pink House!

Patrick and I thought this day would never come …the day we would no longer live in the PINK house! (Warning – get ready for an image-heavy post!)

Although we immediately fell in love with the general charm of our house, the one thing we never liked was that it was a pink house. The salmon-colored body color with the dark pink accent just wasn’t our style. Unfortunately our dreams of a different color were crushed when we got a number of painting estimates two years ago. Fast forward to 2009 (i.e. a couple of years of saving $) and exterior paint that looked like this…

Paint chipping

…and we decided we were in dire need of revisiting the exterior painting subject. Like urgently.

So we called one of the painters from two years ago (who was our favorite based on the historic house painting experience) and said “if the cost is the same as 2 years ago we’ll go with you.” Before we knew it we were told “we’ll be there tomorrow morning.” Holy dog doo doo – this was really about to happen!!

The first step in the process was to pressure wash the house. This was to get rid of any loose paint. Here is the south-facing wall of our house after it was pressure washed:

Pressure washing

Pressure washing in action:

Pressure washing

The next step was to scrape off any semi-loose paint that the pressure washer didn’t get off:

Scraping paint

Close-up of a south facing window after the pressure washing, scraping, and sanding.

Window trim pressure washing

Choosing the color has been the hardest part of the process. I keep joking that it was harder to decide on an exterior color than it was to get married, haha. (Of course I have such a wonderful husband that it wasn’t a hard choice to want to spend the rest of my life with him!) But seriously, I have some serious color commitment issues. I mean, this is the color I’m (hopefully) going to be stuck with for the next 15 years! This is a big investment! We knew we wanted a more neutral color and decided to head in the grey direction. After a visit to the Sherwin Williams paint store and picking through their selection of greys we initially picked two trial colors: “Uncertain Grey” (how fitting) on the top left, and “Rare Grey” on the top right. We immediately decided the “Uncertain Grey” was way too blue and decided we liked the “Rare Grey” better. However, we were wondering if the color was too pale and thought we may as well invest a few extra bucks and try two other darker shades from the same color swatch: “Link Grey” on the bottom right, and “Cast Iron” on the bottom left. Finally the big decision was made…”Link Grey” (bottom right) was our decision.

Bungalow exterior paint choices

During the painting process we needed to address some house repair issues. The gables on both the north and south facing walls had old diamond shingles on the side. We’ve wanted to get rid of these, so this was obviously the right time. Come to find out there were two more layers of shingles underneath the diamond ones.

Gable shingles removal

The next step was priming. For a day we thought we were quarantined in our own house with all that protective plastic over the windows and doors!

Porch priming

Here the north facing gable has the newly installed siding (from good ol’ Randall Brothers). I think this photo is really interesting because it shows the various stages…old scraped color, newly primed siding, and newly placed wood siding.

Gable siding

The north facing side of the house with primed body and primed window sashes:

Primed bungalow exterior

The north facing side of the house with final body color:

Bungalow body color

On the back of the house we had an area that we’ve also been wanting to fix for a while because the insulation has been hanging out.

Exterior fixing

The only problem was that a mama bird had set up a home in our insulation that we were about to board up! I like to tell myself that the three little baby birds we had to take out of our house were moved by the mama bird over night because they were gone the next morning. (Shhhh, I don’t want to hear your opinions of what else may have happened with them – I’m sticking to my story!)

Baby birds

Here is a beautiful detail shot of the brackets on the front of the house. Previously the dark pink brackets blended in with the cedar shingles. Now the white brackets against the “Link Grey” colored roof decking by the cedar shingles has a nice, bold contrast.

Bungalow bracket detail

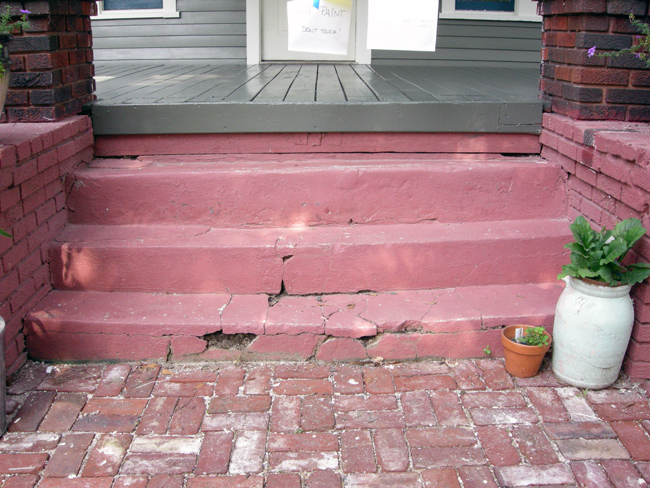
While we were on a roll we thought “why stop here?” We are already working on our new entry door…may as well replace those dangerous entry steps!

Broken bungalow cement stairs

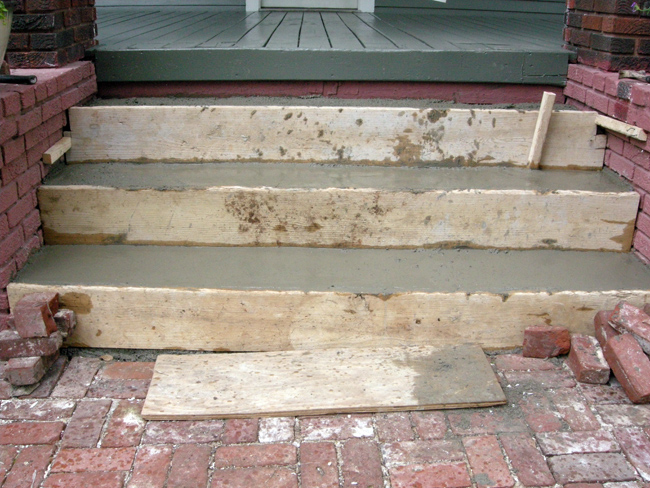
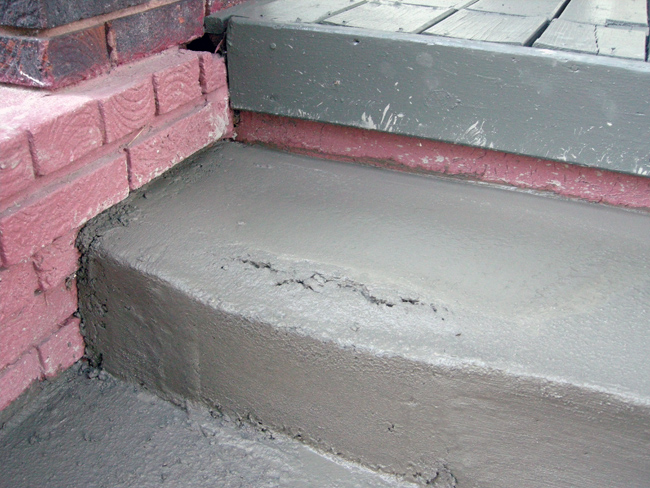
The whole stair process was entirely rushed and unsatisfactory (unlike the painting process), but perhaps I will come back and go into more detail about that another day. In any case, here the steps were being poured:

Bungalow entry stair replacement

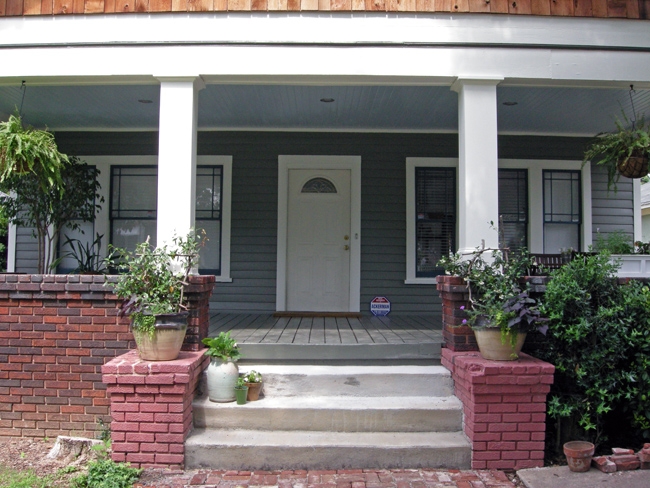
Two and a half weeks later we have the final product – “Link Grey” is the main body color, “Classic Light Bluff” is the trim accent color, “Bunglehouse Blue” is the window sash color, and “Cast Iron” is the chimney color. As pointed out on a previous photo, we had the underside of the roof painted the main house color to create a greater contract against the white accent color.

Bungalow exterior paint

In this “after” porch photo you can see we actually used a fifth color for the porch ceiling based on what we know was often historically used. The ceiling is called “Atmosphere”. We were advised by the lady at Sherwin Williams that this is the color most commonly bought for porch ceiling purposes, so that is how we decided on it.

Repainted porch

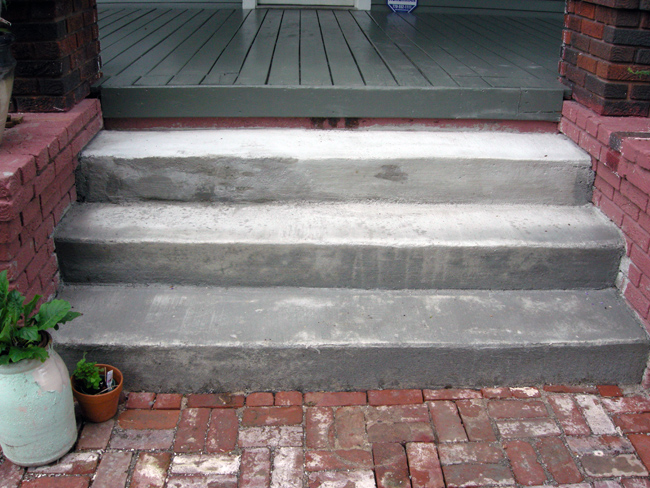
The front of the house in its final form (…well, at least for now…). New neutral grey color with nice contrast to the cedar shingles and dark red brick. And new stairs that you don’t have to stumble down anymore. We love it!!!

Exterior painted bungalow

Posted in Our Bungalow, Photos, Westview Bungalow | Comments Off on We Are No Longer The Pink House!