Archive

We’ve been busy, busy, busy!

We have really been slacking on the blog lately, but Steffi’s parents were in town visiting so we have a good excuse! Of course we did continue working on the house (and the neighborhood) while they were here. We have made some great progress in the garden. We enlarged our vegetable garden, came up with a garden plan, laid out a path, created some new flower beds, weeded the old flower beds, and started a compost pile.
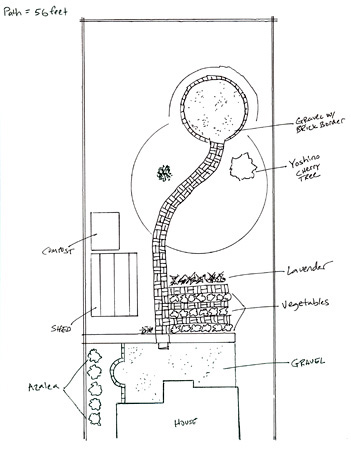
Westview bungalow garden plan

Garden Plan

It took us a while to come up with the plan, but it really helps to have a clear vision of the garden.

We also finally put up the Westview street toppers yesterday. We have been working on these since October (Steffi was the lead on the project), so it was very rewarding to finally see it all coming together. We had a small unveiling ceremony at Ontario Park, and then neighbors drove around with ladders installing them. The street toppers are very important for Westview since people often think we are part of West End.

Westview street topper

Westview street toppers

Months of hard work finally paid off!

Lastly, a couple weeks ago (when Steffi’s parents were visiting) we went to the Inman Park tour of homes. Inman Park is a beautiful old neighborhood on the east side of town, and it holds a lot of historical significance to Atlanta. Their tour of homes is always one of our favorites.

As we walked up to house number six on the tour Steffi’s dad headed inside while we remained outside reading about the house in the handout they provide you. Her dad promptly returned with a huge grin and informed Steffi’s mother she was in for a big surprise! As it turned out Steffi’s younger sister had gone to school with the homeowner’s son. Surprise, surprise! They had recently built a traditional Austrian Weinkeller (wine cellar) in the basement using old bricks, so the conversation turned to where they acquired the bricks.

I’ll pause the story here to explain why old bricks are significant. We have been looking for old weathered bricks since we bought the house. We want to tear up the front walkway, which is currently broken concrete, and replace it with brick. We specifically wanted old bricks to match the old house. New bricks just don’t have the same character. Unfortunately we haven’t had much luck. It seems that when a building is torn down these days a lot of the time the bricks are sold, recaptured, and then re-sold. Additionally, we don’t have many connections to the demolition industry in Atlanta, so we had no clue how to go about trying to ask for bricks that are headed landfill. This has been a very frustrating situation for us.

Okay, so back to the story… Sandi told us she would have to check with her husband, but they had a pile of old bricks left over in the backyard from the construction of the wine cellar. Could it be true?! Had we finally found the elusive bricks we were looking for? We got her email and phone number and left with our fingers crossed.

We waited for the weekend to be over since we knew they would be occupied with hundreds of people touring their home! Steffi sent a couple emails back and forth with Sandi, and finally the email we had been waiting for came through. She told us to come and get them!!!

This morning our neighbor Carl from West End rang our doorbell bright and early (10:30am) and offered to help us with his truck. We made a trip over there and filled up the truck and the trunk of our car. Then we headed back to the house to drop them off. We probably were able to move at 1/3 of the bricks on this first trip. (THANKS FOR THE HELP CARL!) Steffi and I then returned four more times by ourselves and were able to move the remaining bricks in our car. In the end when we stacked them up they look like a palette of bricks. Lucky for us it seems as if it is going to be exactly the number of bricks we need for the front path. Hooray!

So we have to say a MASSIVE THANK YOU TO SANDI AND KEVIN for giving us the bricks!! It means more to us than we can really express in words. They also put a lot of hard work into removing the mortar from the bricks, and we know that is no easy task. THANK YOU! THANK YOU! THANK YOU SO MUCH!

We had a lowrider with all those bricks in the trunk.
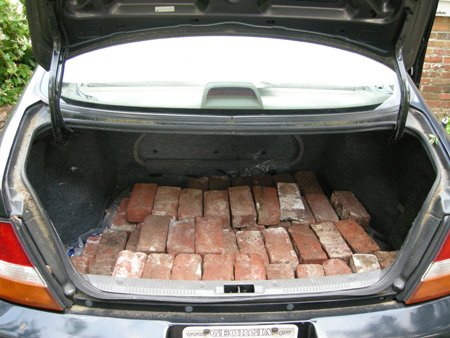
Trunk full of bricks

Trunk full of bricks

Pile of bricks

A big old “Pile-o-Bricks”

Steffi with bricks

A girl and her bricks have never been so happy!

Old Bricks

Check out the beautiful old bricks!

Posted in Gardening, General, Our Bungalow, Our Neighborhood | Tagged , , , , , , , , , , , , , , , | Comments Off on We’ve been busy, busy, busy!

Working in the Garden

We started working in the garden again! Our wonderful neighbor Christy told us about a place in Loganville where you can get plants for cheap. We all made a trip up there and came back with some great stuff for the yard. Steffi and I have also finally come up with a half decent plan for the backyard, so we are slowly working on making it happen. We also dug up a ton of concrete!

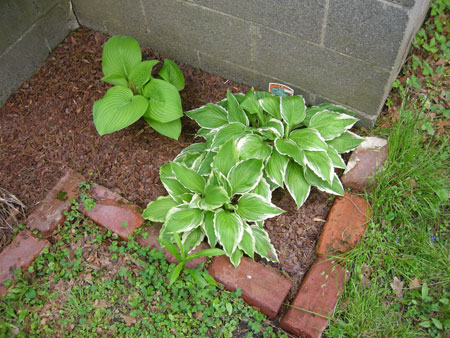
Check out the hostas from last year. They came back STRONG!

Hostas

We dug up a lot of concrete – now we just need to figure out how to get rid of it.

Pile of concrete

We started by making some small flowerbeds along where the path will go.

Flower bed

Here’s another one of the flowerbeds. They will eventually all become one big flowerbed!

Flower bed

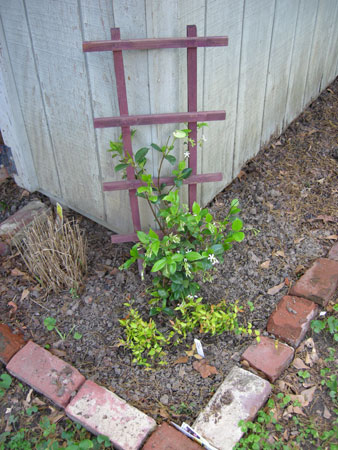
We planted some Jasmine by the shed. We aren’t sure what the colorful plants are in the front – they had no labels!

Flower bed

This is the start of our “woodland garden” behind the shed. Nothing but hostas and ferns! It should grow in nicely.

Woodland garden

Posted in Gardening, Photos | Tagged , , , , , , , | Comments Off on Working in the Garden

Mouse in the House

Here’s a story I forgot to post about back in January when it happened…

It was right after New Years. Patrick walked in the kitchen and yelled that a mouse was on our kitchen counter! The next few minutes must have looked rather funny from the outside – us running around like idiots with a box, trying to catch the mouse. It ended up somewhere in the laundry room and we knew we wouldn’t be able to find it amongst our storage mess.

Since we had gone on a mini vacation after Christmas we just left a few of our Christmas presents under the tree. One of them being a food basket with maple syrup, pancake mix, a pound cake, etc. As we were taking out the items to put in the pantry we noticed someone had gotten to the pound cake before us! Part of the plastic wrapping was missing…instead there was a chunk gone from the cake. The little bastard!

Another night we were sitting on the couch watching TV. And who do you think comes running across the floor, right in front of our faces?! None other than “mouse in the house”! The nerve! And again we had a funny episode of a mouse chase. “Quick, get a box!”…”Pick up the chair!!”…”Where did it go??”…”Is it hanging on to the bottom of the chair??”…”No!”. The mouse had gotten away again.

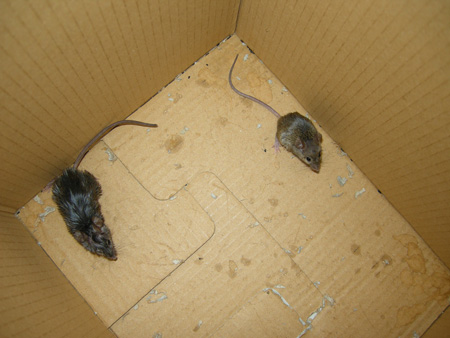
That night we heard it running around the house as we were falling asleep. That’s it; we had to get a mouse trap. Since it wasn’t going to contribute in rent or pick up some groceries we had to give it the boot. So the next day we went to the big box store to find a mouse trap. We looked horrified at all the “Will Kill!” boxes. We didn’t want to kill the poor little mouse; we just wanted it out of our house! So we found a cheap seesaw mechanism that would entice the mouse to walk in towards the food, then snap the door shut when its weight would shift. A “No Kill” trap. So we went home, put some peanut butter on the trap’s end, placed it along a wall and went to bed hoping we would catch a mouse. Sure enough, we woke up in the morning and had a little friend in our trap. AHA! Take that you little mouse, you! We got out a box and let is slide out of the trap. Our plan was to release it in a park later on. In the meanwhile we put some peanut butter in with it. Just look at our cute, adorable little evil-doer…

Mouse in the house

Well, we didn’t quite get that far as releasing it in the park. Next thing we knew another mouse was running across the floor in front of us. Had our little mouse escaped the box? We checked…it was still there. Our next fear was – if this is mouse number two, how many other mice could there be?! Two mice can easily turn into a million! Mouse #1 would have to make do in the box for another night. The trap was set again. Excitedly we checked the box the next morning. Negative. No mouse was in it – bummer. Mouse #1 would have to wait yet another night. And the next morning – success! We caught mouse #2!

Mouse in the house

So we drove to release the mice. We turned over the box and mouse #2 (slightly larger than mouse #1) bolted out of the box, never to be seen again. Mouse #1 however wasn’t coming out. We turned the box entirely upside down…it wouldn’t come out. It was clinging onto the box with dear live. We started shaking the box until it finally fell out. It was just sitting there, shivering amidst the leaves and pine straw, not moving.

Mouse in the house

This is where we started getting a little “emotional”. How could we leave this poor little shivering mouse in the cold?? It could die out here! We’d been so busy trying to get the mouse out of our house and now we were pacing back and forth discussing taking it back to the house! So we determined we had to take the mouse back to the house and feed it back to health. Obviously leaving it in the box all those days with relatively little food (just the bit of peanut butter we had put in there) must have weakened it. After working so hard not to kill it we couldn’t very well leave it there to die. So we took it back, gave it some more pound cake (hey, it had already had some, we may as well give it the rest, right?), and hoped it would regain energy. The next day we drove it back to the park and turned over the box. Poof, it was gone. It had no trouble running this time.

Relieved that this episode was over we went back to the house. And that’s the story of our mouse in the house…

Posted in Photos | Tagged , , , , | Comments Off on Mouse in the House

Working on our built-in linen cabinet

Okay, we haven’t been posting a lot lately, but it’s because we have been busy working!!! Sometimes when you work until late in the evening there just isn’t time to write.

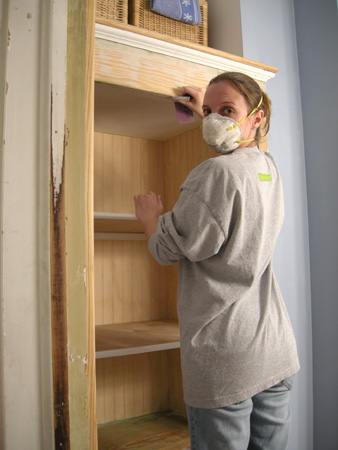
Our latest project has been stripping, sanding, and re-painting the linen cabinet in our bathroom. We loooove our built-ins, so we have spent way too much time taking all the paint off just to put paint right back on. It is a little painful when you work so hard to just cover it back up, but it looks really nice in the end. (So it is worth it!)

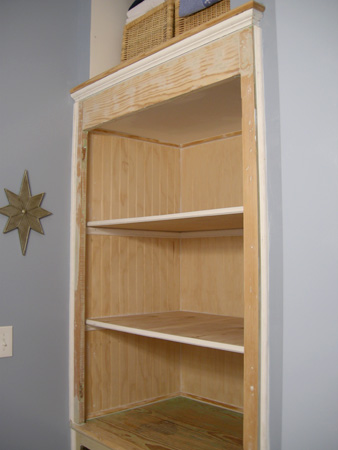
The linen cabinet in our bathroom was still 100% in tact when we bought the house, and it was carefully preserved under 90 years of paint. With a little help from the trusty heat gun and the old paint-stripper we were able get most of the paint off. Then a lot of sanding (by hand) made the surface flat. The sanding really is the most important part since it is what really makes the final finish look good. Make sure to use a fine grain sandpaper to really get it smooth. If you don’t sand enough you might as well have just painted over the existing paint. We like to think of our built-ins as pieces of furniture that are attached to the floor.

The linen cabinet originally had plastered walls, but we decided to line it with the beadboard to tie it back in with the room. Our contractor also built us new shelves.

So here are the photos:

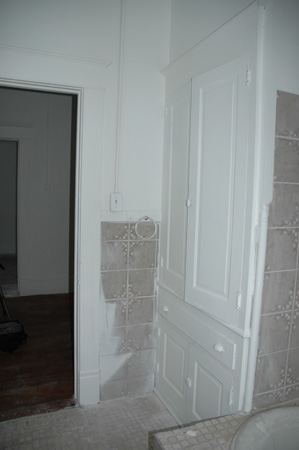
In the beginning… It doesn’t look so bad in the picture, but it was covered with so many layers of paint. The last layer was a flat white latex paint. It was obviously the cheapest paint they could find. It needed some TLC, but you’ll just have to take our word on it.

Linen closet before

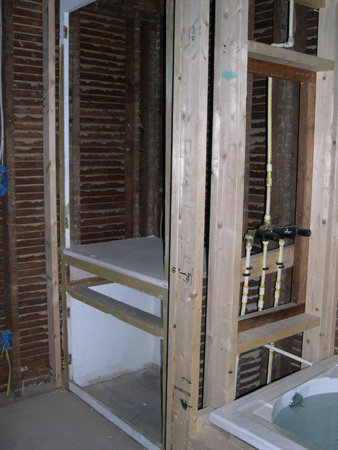
This is what it looked like when we took it all apart! It looked quite bare in this state. I still can’t believe our bathroom looked like that at one point.

Linen closet construction

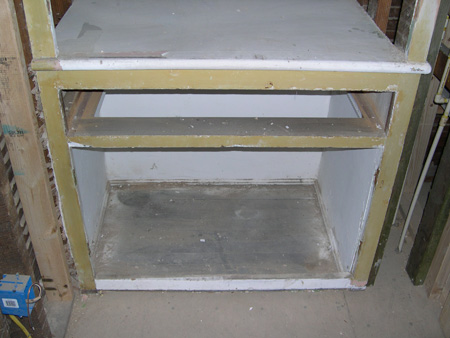
And the bottom portion at the same time…

Linen closet paint stripping

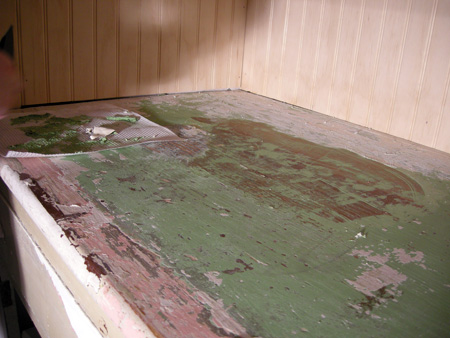
Aren’t those colors lovely?! These are a few of the many layers of paint we had to remove.

Linen closet historic colors

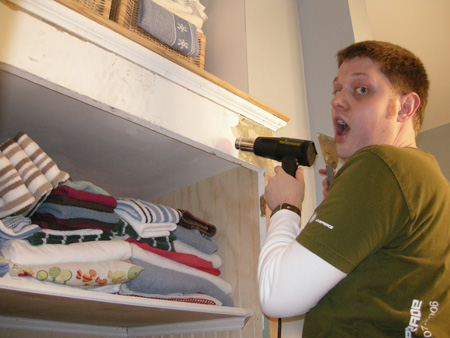
Working with the heatgun. Yes, we were too lazy to take everything out of the cabinet.

Linen closet paint stripping

Doing the final sanding. This is one of the most important parts.

Linen closet sanding

Ready for paint!

Linen closet sanding

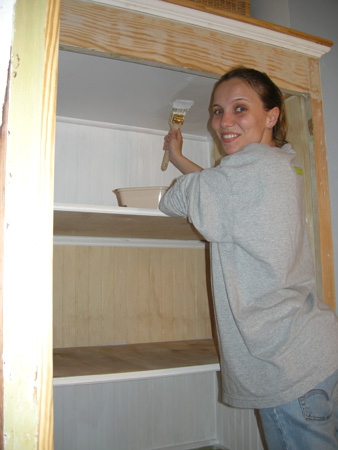
Have you ever seen anybody so excited to paint? Didn’t think so…

Linen closet painting

I like this view! :) We added this little storage space over the linen cabinet, and we painted it blue to match the walls.

Linen closet painting

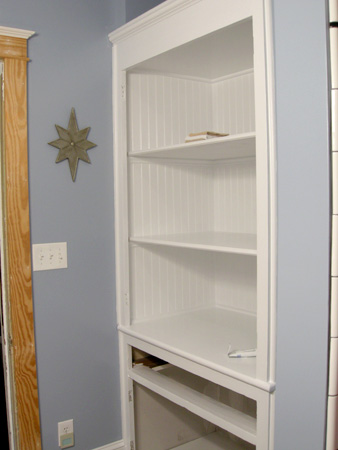
The finished product! This is really when all the hard work pays off.

Linen closet painted

We still need to do the doors, and we have started working on the drawer. Of course with the tempature warming up we might be spending more time in the yard over the next few months.

Posted in Our Bungalow, Photos | Tagged , , , , , , , , , , , | Comments Off on Working on our built-in linen cabinet

Attic Insulation

I think insulation, or the lack thereof, is always a big issue with these old homes. Our home, like so many others, has none. When we redid the kitchen, bathroom, and laundry room we were able to put insulation into the walls at that point. All other rooms as well as the attic and crawl space remained open territory – the perfect openings for all of our heat to wander off through.

It doesn’t help that I like warm temperatures. In the summer I’ll always carry a jacket with me because I know any place I go – the grocery store, a restaurant, someone’s house – I’ll end up freezing. That also means I like to crank up the heat in the winter time to feel nice and snuggly warm. As the temperatures started dropping in the fall we generously turned on the heater. As it got colder the bills got higher and we adjusted the thermostat to more conservative measures. Then we got another higher bill. We adjusted even more conservatively. And the bill came in higher again. I know as the months went on and the temperatures kept dropping that the bills would go up, but it was weird nonetheless that the more we tried to be thermostat conscious, the higher the bill ended up getting.

A few weeks ago, after having received a second bill that was creeping towards the $400 mark (!!!) we said it was time to cough up the money for some insulation. Throughout the winter we had talked to various neighbors discussing their attic insulations and we knew we needed it too. Now we just knew we really had to get it done. (Of course…just in time for spring and temperatures going up – aren’t we so smart!)

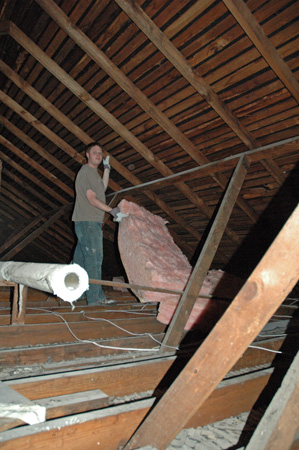
Today we got it done! I had to dig through some old pics to find some of the attic pre-insulation. Here’s Patrick trying to make use of the 3 left over pieces of insulation last March…

Attic insulation

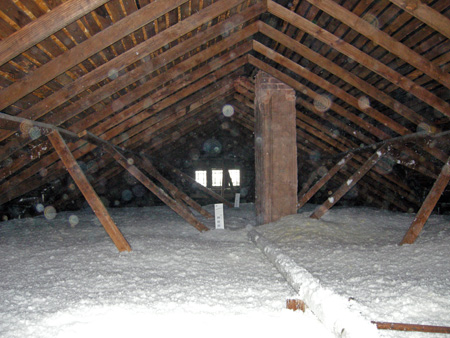
And here’s the attic after today. A winter wonderland! Not sure how much the bills will change this year, but next winter I better be seeing some savings on those gas bills!!

Attic insulation

Posted in Before and After, Our Bungalow, Photos | Tagged , , , , , , | Comments Off on Attic Insulation